Layered Tiles

6/9/2024

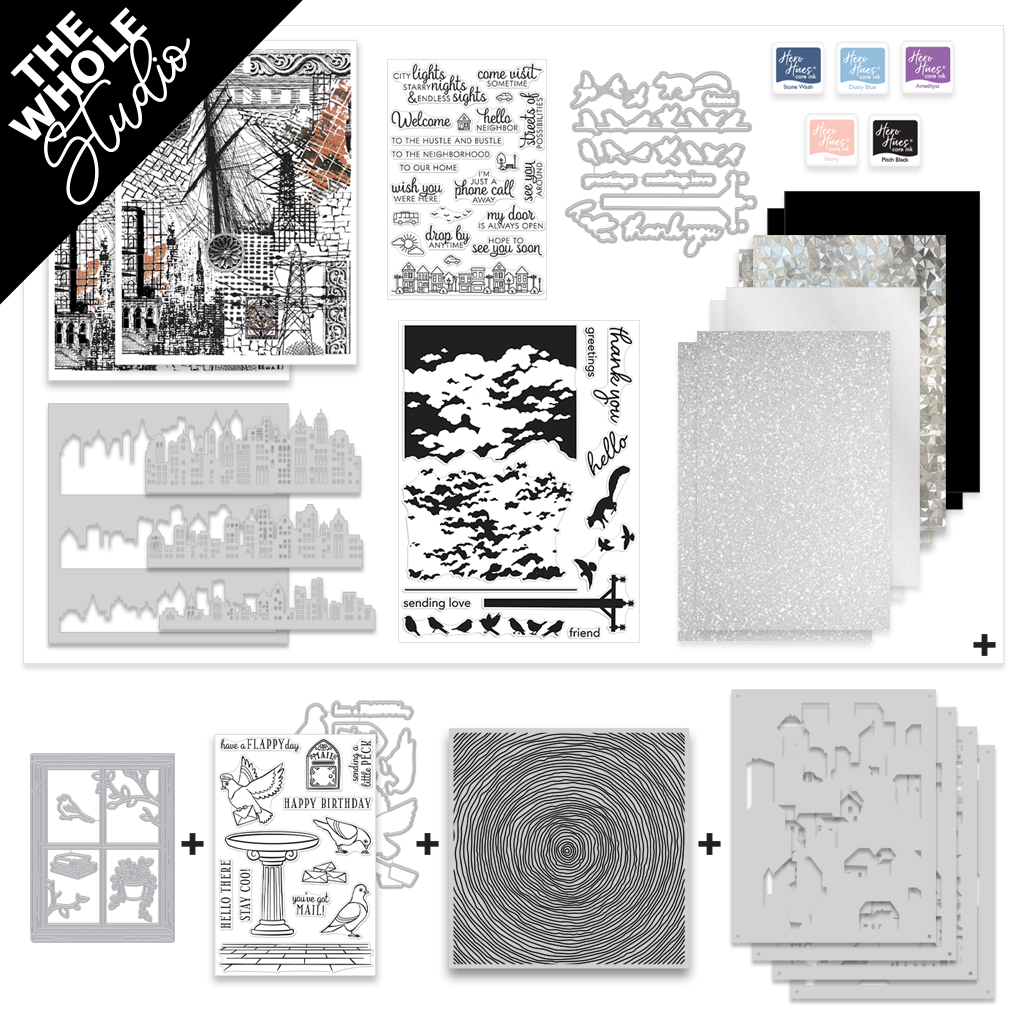
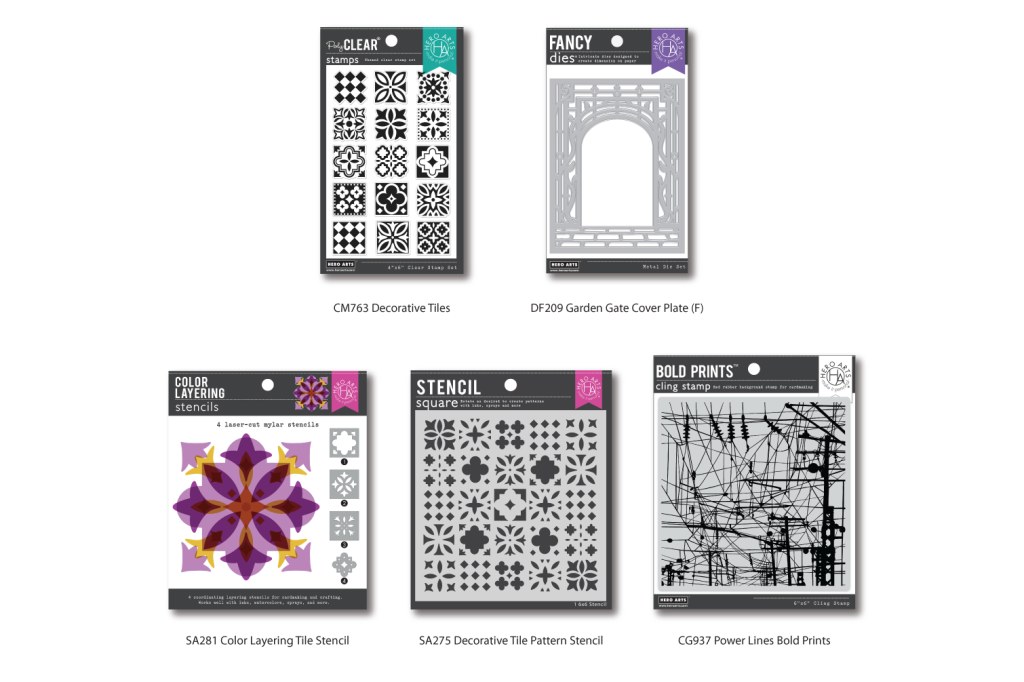
One of my favorite themes from the June Hero Studio is the tiles from the Extraordinary Extras! These items will restocked if they go out of stock, unlike the Card kit of the Month. When I saw the tile stencil and stamp set I knew instantly what I wanted to do with them. They remind me of the handprinted tiles from Mexico I saw on vacation.

For both projects, I started with the stencil so I would have even spacing between tiles. For the blue card I used Summer Sky ink. For the colorful card I did rows of Butter Bar, Papaya, Azalea, Fresh Lawn and Summer Sky.

Then I put those stenciled panels in the Misti and got to stamping. The Misti made quick work of the stamping. I introduced Nautical ink to the previous inks. I lined up 3 or 4 stamps at a time and then used the same inks to layer on top of the stenciled tiles. I wasn’t going for perfection here, the tiles are hand painted and I like the look of imperfection so if the ink was uneven, I didn’t really a second or third pass.

The blue ones were really easy as I only used two inks Summer Sky and Nautical. It looks like more inks because I ink blended the stencil and stamped with summer sky which gave me two shades of the same color plus the nautical.

I finished the cards with a Gracias die from Simon Says Stamp and some pearls. Now, I am in need of a Feliz Cumplianos and other Spanish sentiments.

Thank you for stopping in and reading my blog. 🙂

Hero Arts Studio June 2024

6.3.2024

It’s Here! The first Hero Studio release is finally here! Our beloved My Monthly Hero Kit has been reimagined into 5 new subscriptions. The subscriptions are Card kit of the Month, Fancy dies of the Month, Layering Stencils of the Month, Clear Stamp & Dies of the month and Cling Stamp of the Month or you could get The Whole Studio which is all of the subscriptions at a discount.

The Card Kit of the Month is comparable to the My Monthly Hero Premium kit. For my card today I did a clean and simple card using the Neighborhood Messages stamp. I stamped the neighborhood using Intensified Black ink on Hammermill paper. I added the sentiment and then the sun/clouds and birds. I used Copic markers to color in the neighborhood in a rainbow. I trimmed that panel down so the neighborhood fit just perfect and adhered it to a Pitch Black card base.

KIT INCLUDES:
Urban Sky HeroScape Clear Stamp Set, 6” x 8”
Neighborhood Message Clear Stamp Set, 4″ x 6″
Coordinating Dies
City Stencil, 6×6 (with 3 Fall-Out City Skylines)
5 Ink Cubes (Peony, Pitch Black, Dusty Blue, Stonewash, Amethyst)
2 Sheets each of Silver Foil, Silver Glitter, Silver Cube & Pitch Black Cardstock, 5.5″ x 8.5″
2 Sheets City Textures Hero Transfers

But wait….there’s MORE! along with the FIVE monthly subscriptions there are Extras every month. The tile theme for this months Extras is giving me bold and colorful hand painted tile vibes but I chose the soft look of the Garden Gate cover plate to highlight today.

I had a lot of fun with the Garden Gate cover plate. For this card I die cut the garden gate with Neenah cardstock. I did some ink blending of Nautical, Summer Sky, Fresh Lawn and Charcoal core inks. The only part I measured was the charcoal because I only wanted it behind the stones. I did dry embossing with that ink blended panel and adhered the garden gate with Precision glue.

This was the perfect backdrop for a little bird bash scene using the Clear Stamp and Die of the month. I used Contour ink and Copic markers to color the birdbath and pigeons and die cut with the coordinating dies. I did add a little white and black gel pen for the eyes. It really made them come to life. The sentiment is from the same set.

We will give away a $50 gift card, drawn from the comments left across the hop. Enter by Sunday, June 9th at 11:59pm Pacific, and the winner will be announced on the Hero Arts blog the following week.

Hero Arts
Hero Arts Creative Team:
Channin Pelletier
Charlene Madrid
Dana Joy
Heather Ruwe
Ilina Crouse
Jennifer Kotas
Kailash Naidoo
Karen Brown
Lydia Fiedler
Michelle Short
Natasha Polite
Natasha Vacca
Pocono Pam
Rachel Kleinman
Rosie Lopez
Seeka <—–Next on the Hop!
Special Guests:
Nichol Spohr
Kelly Taylor

Class of 2024

4/29/2024

This is a special graduation year for me. I started teaching preschool in 2009 and my very first class of students is graduating high school this year! I have remained friends with some of their parents on social media and it is crazy to think those little 3 year olds are now finishing high school!

I created these graduation cards with a few Hero Arts dies. These first two cards I die cut 2024 using the Number dies. You can purchase these individually or in a bundle. The first card I dies cut from Nautical cardstock and the second is from Iris cardstock. I used the largest number in each package.

Then I used the Luggage Tag alphabet frame cuts to spell out “Class of” from Mustard and Pitch Black cardstock. I did stack the die cuts with two layers for some dimension.

I used glitter cardstock from the Glitter Paper Basics and Glitter Paper Holiday Sparkle for the backgrounds. I arranged the large number die cuts to overlap and and adhered them with Precision glue.

Because I didn’t have any red glitter paper, I made my own with Cranberry cardstock and Red Metallic spray. I let it dry and die cut GRAD from the Letter Fancy dies. These are also sold in small groups or in a bundle. When I die cut the letters I avoided the outside edge so I could use it as a mat. I trimmed down a Nautical card panel and adhered it to the red panel. I arranged the letters and adhered to the background.

Then I decided to emboss CONGRATS on the panel. This sentiment is from the Message Basics stamp set and I used Embossing & Watermark ink with Clear embossing powder. In retrospect, I should’ve embossed before adhering the letters and the background panels but it worked out okay.

I choose the colors for each card based on the school colors for the high schools in my area. My goal is to send a graduation card to each of the preschool students I can still reach before the end of the school year. They probably don’t remember me but they started my career and I will always remember them.

Floral Birthday

4/18/24

I made these quick and easy floral birthday cards using Hero Arts Floral Garden stencil and Glitter Hero Paste. I started by using the stencil on Deluxe Smooth White Cardstock. I ink blended with Green Apple or Fog, Butter Bar, Tangerine, Peony and Cotton Candy core inks. I didn’t take the time to mask anything off, I only used small blending brushes and a light hand.

After the ink was set I applied the Glitter Hero Paste in select areas, I didn’t cover the entire stencil. I wanted the glitter paste as a accent around the edges. After it dried completely, I trimmed down the panels and adhered to a card base.

I dug through my stash of extra sentiments and found some birthday ones. I used a hot foil sentiment, a die cut sentiment and a stamped sentiment from this Wildflower bundle. I finished them off with some silver Hero Pearls. I love the consistency of these drops, it makes perfect little drops.

Thank you for popping by! I appreciate your support by using my affiliate links. Have a great weekend!