I’ve had been wanting to share this set of cards but then life happened and now it’s the end of the month. July has just flown by and August is basically over so that means it’s almost Christmas, right?!
The background started off as a some extra metallic spray I didn’t want to go to waste. I mopped up some Blue and Royal Purple metallic spray from my glass work surface with a half sheet of large watercolor paper. Then I used the Ocean Waves bold print with Deep Ocean and Orchid care inks. I did some light stamping on top of the shimmery watercolor panel. I was not looking for perfection at all, I wanted imperfection and some areas blue and others purple.
Then I die cut the Sea Creatures fancy dies from Copic-friendly cardstock and Copic colored. I made a few sets of the creatures including the coral and shells.
That was basically it! The rest is just putting the pieces together and sentiments. I trimmed two panels down to slightly smaller than A2. One for a vertical card and one for a horizontal. I heat embossed sentiments from the Hero Arts July Card kit of the Month and then added them to card bases. I adhered the critters to cards with Precision glue.
For the last card, I couldn’t throw the last scrap of that gorgeous background so I made it a design element! This one needed a little something extra so I pulled out the Lacquer Pen and Snowfall glitter for highlights. I also used that Lacquer pen to create some bubbles as a finishing accent.
Thanks for popping in today! Check back in a couple days, I have another ocean-themed project to share…..and it’s not a card, it’s a mini album!
Well these are fun and easy summer birthday cards! This color layering beach ball stencil is the star of the show. I used Hero Arts core inks in Azalea, Deep Ocean and Papaya to create two backgrounds. I went pretty heavy on the ink because I wanted bold and bright color.
Next, I used the Luggage Tag Alphabet dies to die cut the word BALL from the center of Azalea and Papaya card panels and layered it on some white dies cuts for dimension. Then, I adhered the trimmed down stenciled background to the colored cardstock mat. No one will ever know I die cut the letters from that mat….except you.
I used sentiments from the Let’s Celebrate stamp set to make the small sentiment strips. I arranged the sentiment on the card and followed the curve of the large beach ball but I also used the opposite color from the mat background for contrast. To finish the cards I used Lacquer pen on the die cut letters to make them look like a plastic beach ball.
Wouldn’t these be fun cards for a summer birthday? I am a December baby so I always dreamed of having a pool party birthday when I was little. I hope you all are staying out of this summer heat wave! Thank you for stopping by and as always, I appreciate your support of my affiliate links.
Welcome to the July Hero Studio blog hop! I am super excited for this kit. It is classic Hero Arts style in one of the most popular summer themes….ocean beach.
Every month Hero releases a Card Kit of the Month and 4 Monthly Mini subscriptions. You can subscribe to each individually or the Whole Studio. Plus, every month there will be some Extraordinary Extras you can add on to your subscription.
Card Kit of the Month: Victorian Seaside
2 Sheets Each of White Lava Holographic, White Rainbow Holographic Cardstock, 5.5″” x 8.5″””
Victorian Seaside Clear Stamp Set, 6″” x 8″”
22 Coordinating Dies
Sand Castle Fancy Dies
Rock Cling Stamp, 6″” x 6″”
Victorian Seaside Reactive Palette Ink Pad
2 Sheets Map Hero Transfers (Rub-ons), 6″” x 8″”
2 Sheets Each of Blue, Purple, Green Vellum, 5.5″” x 8.5″”
To create my Card Kit of the Month project I stamped the cling background on Sand cardstock with Embossing & Watermark ink. this gave a subtle rocky shore look. I them stamped the scenes on two card panels using Soft Sky, Dusty Blue, Periwinkle inks for the water. I used Sand ink blending for sand and Dusty Blue ink blending for the sky. I did make sure to space the elements apart so I’d have room to die cut the squares. I used a Square Infinity die to make each of the squares and adhered them with Precision Glue.
My second project focused on the Cling Stamp of the month. This bold print looks like tentacles and could be used in so many ways. I sprayed a 6×8 sheet of bristol smooth paper with Royal Purple, Blue and Ocean Blue metallic sprays. I did a light spray all over the panel and let it air dry. After it was completely dry, I used Black pigment ink and clear embossing powder to stamp and emboss the image. Then I pulled out my liquid watercolors in Bright Purple, Dark Teal and Indigo to add more color and highlight the tentacles.
To finish off the card, I trimmed down the panel to leave a large white border and added a sentiment from the Tropical Fishes stamp bundle and added some clear enamel dots. I never waste even a small piece of a beautiful bold print stamped image so I made another card with the leftover strip. A premade sentiment and some clear blue enamel dots to finish this card.
Because I loved this bold print so much, I didn’t stop with just one project! I stamped it out on watercolor paper and heat embossed. Then I saturated the paper with clean water and brushed watered down Dark Teal, Jungle Mist, and Indigo liquid watercolor all over. It dried back and gave me an all over blotchy look that I wanted. I let that dry completely. Then I went over the tentacles with Bright Pink and Indigo liquid watercolor. The grey was a Tombow Dual brush marker.
I liked the dark deep ocean feel of this card but it was still a bit too bright so after I cut it down to an A2 panel, I ink blended Nautical core ink on the edges. The sentiment is from Encouragement Sentiment Strips.
Thank you for hopping along today! I hope you enjoyed my projects and they inspire you to do something creative. We will give away a $50 gift card, drawn from the comments left across the hop. Enter by Sunday, July 7th at 11:59pm Pacific, and the winner will be announced on the Hero Arts blog the following week.
One of my favorite themes from the June Hero Studio is the tiles from the Extraordinary Extras! These items will restocked if they go out of stock, unlike the Card kit of the Month. When I saw the tile stencil and stamp set I knew instantly what I wanted to do with them. They remind me of the handprinted tiles from Mexico I saw on vacation.
For both projects, I started with the stencil so I would have even spacing between tiles. For the blue card I used Summer Sky ink. For the colorful card I did rows of Butter Bar, Papaya, Azalea, Fresh Lawn and Summer Sky.
Then I put those stenciled panels in the Misti and got to stamping. The Misti made quick work of the stamping. I introduced Nautical ink to the previous inks. I lined up 3 or 4 stamps at a time and then used the same inks to layer on top of the stenciled tiles. I wasn’t going for perfection here, the tiles are hand painted and I like the look of imperfection so if the ink was uneven, I didn’t really a second or third pass.
The blue ones were really easy as I only used two inks Summer Sky and Nautical. It looks like more inks because I ink blended the stencil and stamped with summer sky which gave me two shades of the same color plus the nautical.
I finished the cards with a Gracias die from Simon Says Stamp and some pearls. Now, I am in need of a Feliz Cumplianos and other Spanish sentiments.
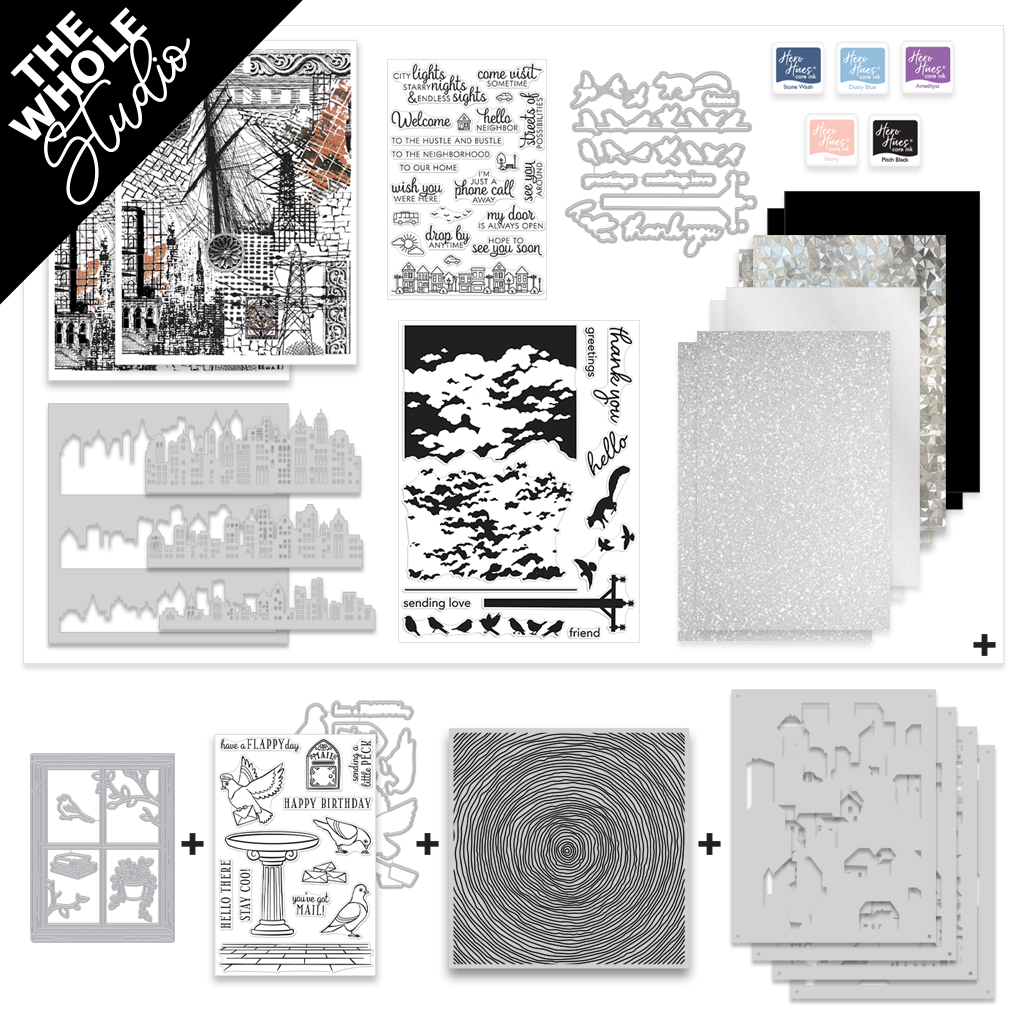
It’s Here! The first Hero Studio release is finally here! Our beloved My Monthly Hero Kit has been reimagined into 5 new subscriptions. The subscriptions are Card kit of the Month, Fancy dies of the Month, Layering Stencils of the Month, Clear Stamp & Dies of the month and Cling Stamp of the Month or you could get The Whole Studio which is all of the subscriptions at a discount.
The Card Kit of the Month is comparable to the My Monthly Hero Premium kit. For my card today I did a clean and simple card using the Neighborhood Messages stamp. I stamped the neighborhood using Intensified Black ink on Hammermill paper. I added the sentiment and then the sun/clouds and birds. I used Copic markers to color in the neighborhood in a rainbow. I trimmed that panel down so the neighborhood fit just perfect and adhered it to a Pitch Black card base.
KIT INCLUDES: Urban Sky HeroScape Clear Stamp Set, 6” x 8” Neighborhood Message Clear Stamp Set, 4″ x 6″ Coordinating Dies City Stencil, 6×6 (with 3 Fall-Out City Skylines) 5 Ink Cubes (Peony, Pitch Black, Dusty Blue, Stonewash, Amethyst) 2 Sheets each of Silver Foil, Silver Glitter, Silver Cube & Pitch Black Cardstock, 5.5″ x 8.5″ 2 Sheets City Textures Hero Transfers
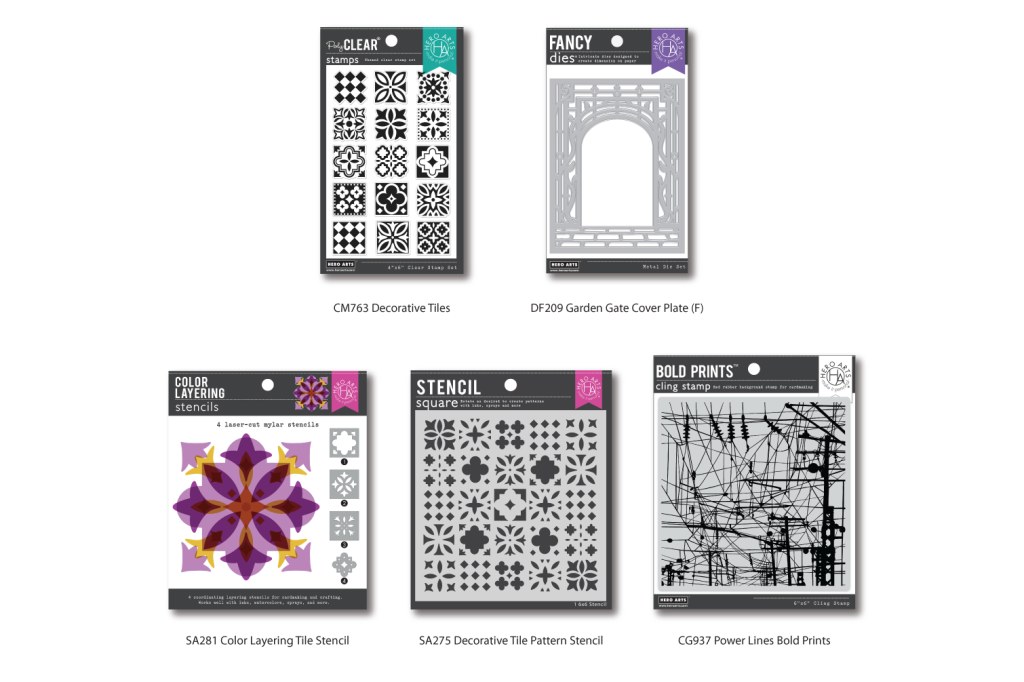
But wait….there’s MORE! along with the FIVE monthly subscriptions there are Extras every month. The tile theme for this months Extras is giving me bold and colorful hand painted tile vibes but I chose the soft look of the Garden Gate cover plate to highlight today.
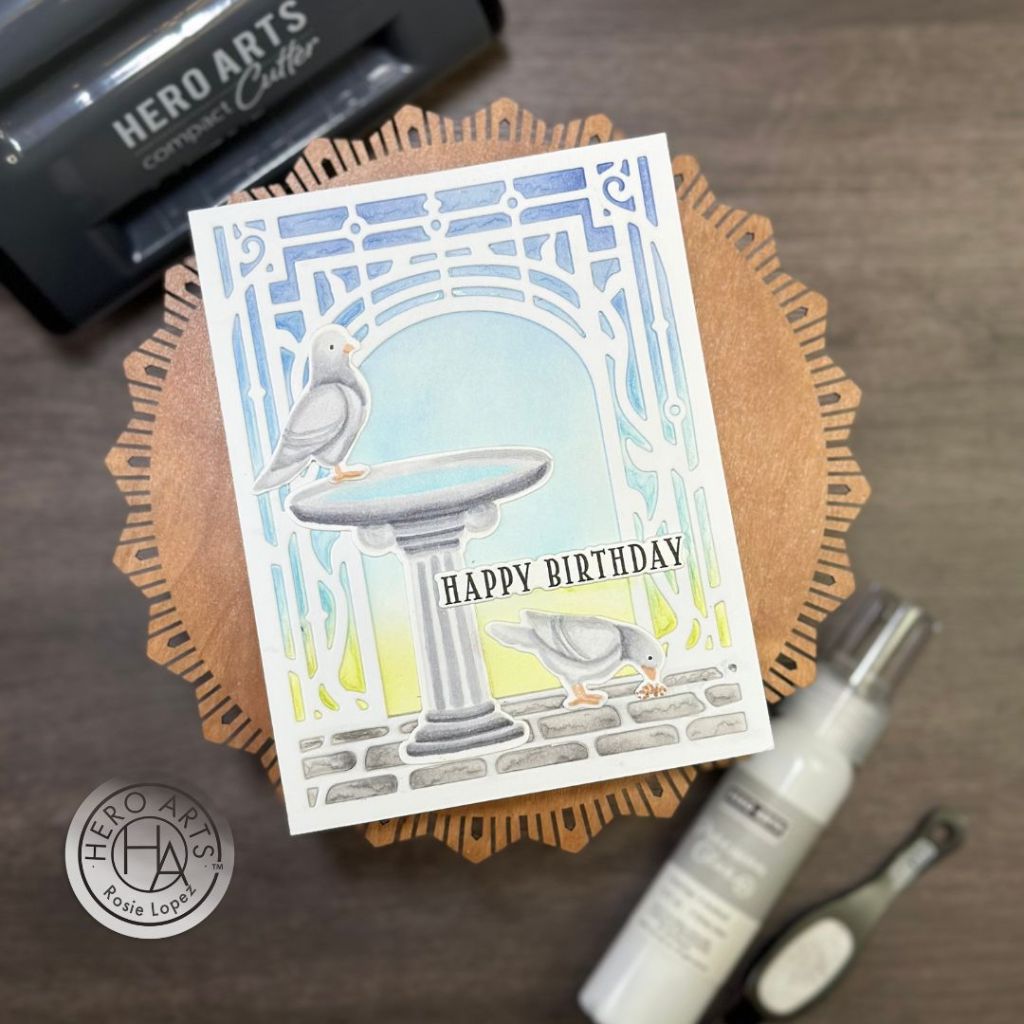
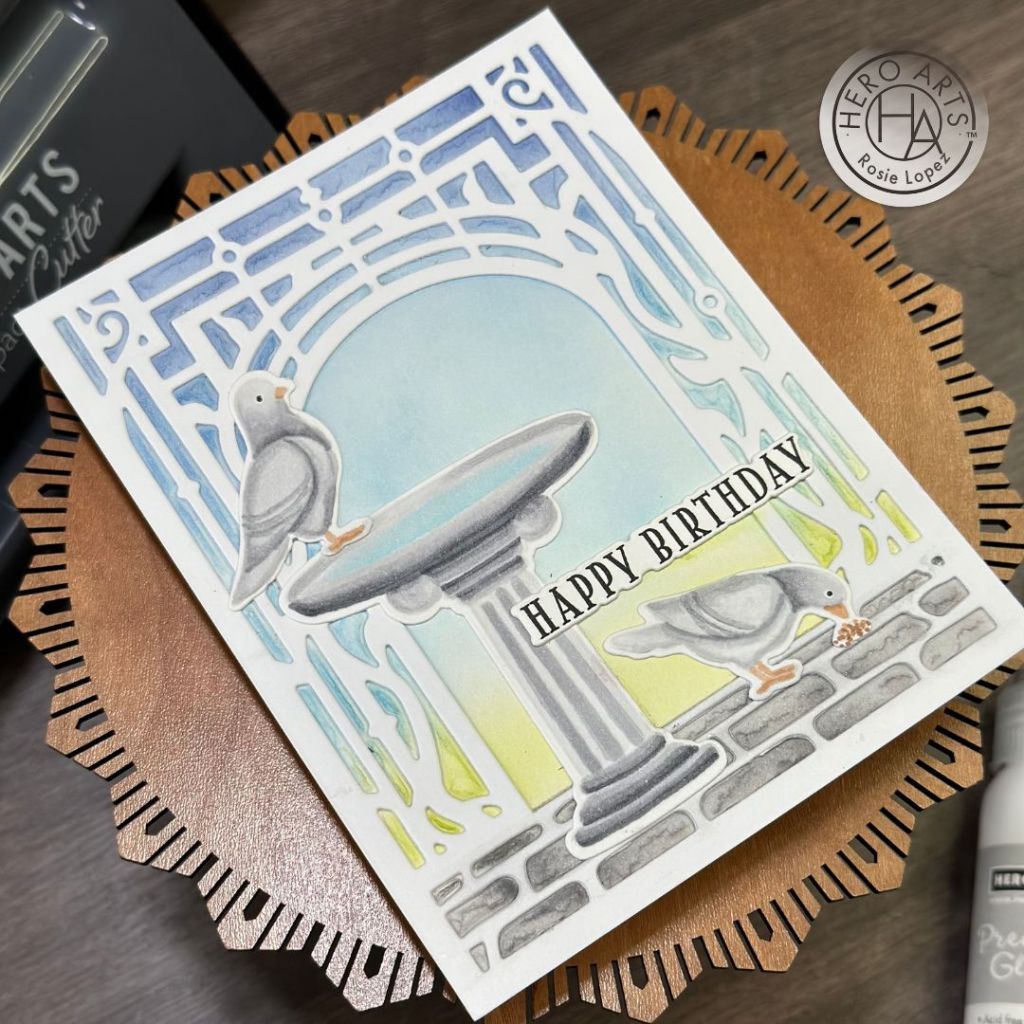
I had a lot of fun with the Garden Gate cover plate. For this card I die cut the garden gate with Neenah cardstock. I did some ink blending of Nautical, Summer Sky, Fresh Lawn and Charcoal core inks. The only part I measured was the charcoal because I only wanted it behind the stones. I did dry embossing with that ink blended panel and adhered the garden gate with Precision glue.
This was the perfect backdrop for a little bird bash scene using the Clear Stamp and Die of the month. I used Contour ink and Copic markers to color the birdbath and pigeons and die cut with the coordinating dies. I did add a little white and black gel pen for the eyes. It really made them come to life. The sentiment is from the same set.
We will give away a $50 gift card, drawn from the comments left across the hop. Enter by Sunday, June 9th at 11:59pm Pacific, and the winner will be announced on the Hero Arts blog the following week.